Panzer Upgrading Part II
So, to the hull (modifying the turret for the plastic Warlord Panzer IV is here - note, this works for the Rubicon version just as well). This can be kept pretty easy. ‘Officially’, the only real distinguishing exterior mark of a Panzer IV J is the lack of the small exhaust muffler for the auxiliary engine. The engine powered the turret rotation, and it was removed to a) simplify production and b) make space for an extra fuel tank to increase the tank’s operating range. From this version, the poor gunner had to crank his wheel - helped by some gearing - to rotate the turret. So if you wanted to keep matters simple, you could just remove the muffler (moulded on the lower rear hull plate next to the two openings for the main engine exhaust) and be done. But if you want to have an accurate IV J, there’s a few more things you’d need or could do.
 First of all, scrape off the vision slits on the left and right-hand sides of the crew compartment, as well as the pistol or message ports on the driver and radio-operator’s hatches. If you want to take it to the next level, you’d also remove the multi-angled lip around those hatches and replace it with a rectangular version, but I decided that would be taking things too far.
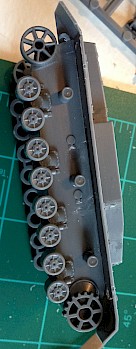
Second, late model Panzer IVs often had only three, all-steel track return rollers. Those would look somewhat different than the rubber-ringed ones on this model, but that I didn’t worry about. I did cut off both middle return rollers with a circular saw on a Dremel tool. Careful, this is a very good tool to reduce finger length! Having done so, I replaced one about in the middle of where the two used to be. The Warlord model has gaps in the track teeth for the return rollers to go, so I removed some in the new location - a dry fit will tell you where this needs to happen - and filled the ‘gaps’ with triangular bits of plastic. Mud would probably hide those gaps just as well… 
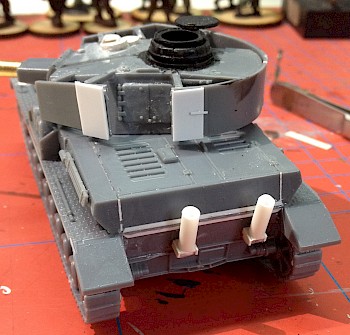
To make this vehicle look like a proper late-war Panzer IV, I decided to replace the standard, horizontal muffler with the Flammenvernichter vertical exhausts. Handily, you can use the holes in the back plate of the hull. I made two bars out of plastic card to the size of the holes, filed a rounded edge to the bottom and stuck them in place. Thin strip was applied to the top and side for the mufflers to sit on, which in turn were made out of plastic tubing. I scraped the inside holes out with a scalpel to thin the sides. Finally, I added some thin strips to represent the connecting strips between the upper and lower rear hull.
That, as they say, was mostly that. A Panzer IV J could easily still have the normal Schürzen for which you could use the provided plastic parts. But as I came this far, I decided I’d see if I could add the Thoma mesh skirts. I had a 1/48 scale set made by Eduard. Once opened, I started to wonder whether it was a good idea. I’m still trying to add them on and figuring out what needs replacing, what should be strengthened and, perhaps, if the entire idea is stupid and will never hold up to gaming. So that’ll be part III!


